Saturday 22 December 2012

An Angel Picture for Amy Beth

It has been a while again since I was claying. The weather is not so good lately, gloomy mornings, rainy days and sleepy evenings, but I manage to finish a commission I had a few weeks back.
An Angel picture for Little Amy Beth who turns One today. Happy Birthday Amy!


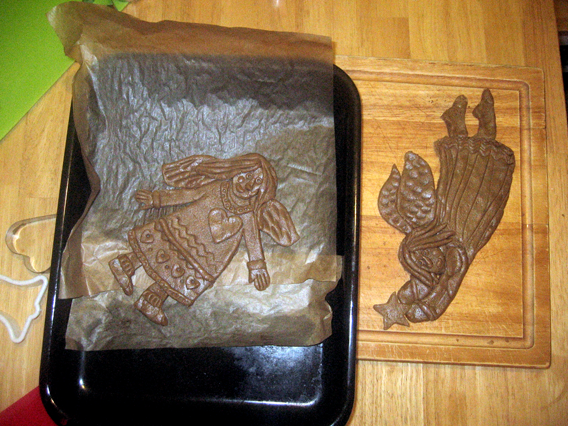
As I made the dress very thin, I needed lots of support underneath to stabilise it during baking.


The stars, The Moon and The Sun are painted with three layers of different paints and finished with a golden one.


It turned out quite nice I think. It looks nearly exactly the same as my first Angel Picture, but I was asked to do so.


Ginger Bread House - finish

I read on many other blogs that people where struggling to join the ginger bread house together. My dough get softer after a few days so I left the parts untouched and when they where ready, I decorated them and simply joined all together with...toothpicks....


It is wise to practise decorating on ginger breads first, before moving onto the house itself;) I used simple icing recipe, but I think smoothness and a good quality decorating tools are the key to success.


When I finished practising I let Liliana and Matylda to decorate all the ginger breads left and apparently they did a brilliant job!


We also manage to decorate our windows with cut-out snowflakes and some snow spray. The house is ready for Christmas to come, so we are! Happy Christmas to You All!


Friday 21 December 2012

Gingerbread House preparation

Did I mentioned I just love baking? As the occasion is just grand, I decided to try to make a Gingerbread House for a decoration this year.
I have just the right recipe for a ginger breads puffy dough, but it needs a specific gingerbread spices mix you can buy in polish shops. The one I used looks like this, if they don't have it, just ask.

The recipe:

0,5 kg  flour for baking
20 dag  liquid honey
20 dag  icing sugar ( I prefer to use soft light brow sugar )
12 dag butter (melted)
1 teaspoon of baking soda powder
1 packet of spices mix for ginger breads

preparation:

Firstly you need to sieve flour with baking soda, then add honey, sugar, melted butter and kneed this dough until glossy. If the dough is too sticky, you can put it to fridge for a bit, but it suppose to be enough soft to roll on the table without sticking to it. If so, you can add some flour underneath and roll on baking paper about 0,5 cm thick. The dough rising in the oven so if you are using cutters, remember to place the ginger breads wit some distance form each other. If you are doing some fine details, the same, bare in mind the dough rise and grow in the oven.

Bake at 180 degree for about 10-13 min until golden, leave it to cool down on the tray for a bit, and
then move it to the flat surface to cool down completely. Ginger breads when moved straight from the oven are very soft so you can make a holes then if you are planing to hang them on the Christmas Tree. I use other side of the paint brush, or a straw to do so. When cool down, become very hard, but after a few days changing to soft again.

Here are some of my attempts:


and The Ginger Bread House before baking :


Christmas Decorations

I really had to share this. On Monday we have been doing Christmas Decoration with Liliana and Matylda, the house look just lovely with those little touches here and there...


So THOSE are four little Angels for our Christmas Eve plates' decorations. Isn't she brilliant?


Liliana and Matylda did some more decorations for our rooms' doors along with entrance door decoration.


I found the idea for a Snowglobe Snowman here, I made those with toddler group on Tuesday two weeks ago but didn't manage to do one with Matylda, so I took some materials home and we did them as a door decoration! Yea!


Monday 17 December 2012

Fall Tree

Just recently I started doing some workshops with babies&toddler group on Tuesdays mornings at St.Francis Centre. I am quite happy with the results and I hope mums as well as toddlers are having fun.
My first workshop was all about "The Fall Tree" as I collected on pinterest a few different Autumn related project for the beginning.


We manage to make 13, means all the trees I prepared up front where gone (I though it will take me around two hours to make them for next day, but it took a lot more than that, lesson learnt.... )
The age group I have is 0-3 so those projects are made for an adult career to accompany the child. All of us had fun and most of the trees were taken home afterwards. Thanks everyone for participating!